This is was something I saw on Pinterest the other day. I had to make it, even thought I’m not a huge banana bread fan, but banana chocolate chip bread with raspberry? Too interesting not to try.
Chocolate Chip Banana Bread with Raspberries via BakersRoyale
Raspberry and chocolate are always good together. So how is it in banana bread?
Chocolate Chip Banana Bread with Raspberries from BakersRoyale
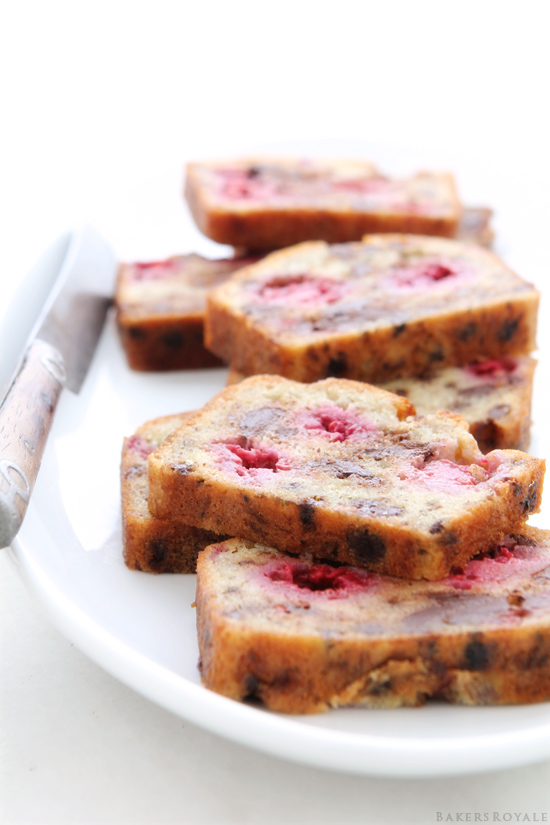
It didn’t disappoint. And it’s better if you eat each slice warm—at least it is to me. There are just certain fruits I don’t like to bite into when cold once it’s baked, it’s a texture thing. Of course on par with most my desserts, my family gave it the big snub. And on par with my response to their snobbery. . . .I repurposed it.
Yep, I took it and turned it into french toast – a favorite in my home. It worked. they devoured it. Yay, me.
Chocolate Chip Banana Bread with Raspberries_ BakersRoyale
CHOCOLATE CHIP BANANA BREAD WITH RASPBERRIES

Ingredients:

  • 1 3/4 cups unbleached, all-purpose flour
  • 1 1/2 teaspoon baking powder
  • 1/2  teaspoon kosher  salt (1/4 teaspoon if using regular salt)
  • 3 large eggs
  • 1 cup sugar
  • 2/3 cups vegetable oil
  • 1/3 cup milk
  • 2 teaspoon vanilla extract
  • 1 1/2 cups bananas, mashed to pea-size lumps (about 3 medium bananas)
  • 1 cup chocolate chips
  • 6 oz. raspberries

Directions:

Preparation: Heat oven to 375 degrees F. Lightly cover a 9x5 loaf pan with non-stick bake spray.
  1. Sift together flour, baking powder and salt; set aside.
  2. Place eggs and sugar in a stand mixer bowl fitted with a whisk attachment, beat on medium high speed until light and fluffy, about 4 minutes. With the mixer running, slowly drizzle oil down the side wall of the bowl, continue with the milk followed by the vanilla extract. Turn off mixer. Gently fold in dry ingredients with a sturdy spatula or wooden spoon. Fold in mashed bananas, chocolate chips and raspberries.
  3. Pour batter into it loaf pan and bake at 350 degrees F  for 45-55 minutes or until inserted tooth pick from the center of the loaf comes out clean. Remove from oven and to a wire rack for to cool completely before removing from pan.


http://www.bakersroyale.com/banana-raspberry-bread/
0
Dirty confessions of a food blogger: You know there was a time I wouldn’t post a recipe if I hated the photo. Silly—I know.  Solid recipe or not, I would just let it languish on my memory card. Or worse yet, I would keep it around to re-shoot (to the point of the baked goods being no longer consumable).
Strawberry-Lemonade Whoopie Pies via Bakers Royale
Look at where I am at now. I don’t like the photos of these strawberry lemonade whoope pies.
Nothing about it makes you want to grab for one. The composition doesn’t show off the whoopie pie. There’s no atomsphere. The white is blown out. The styling is sub-par. The strawberries too blatantly laid out for a color pop. And yes, I know I am definitely hyper critical of myself—which is to say different than striving for perfection—but not that far off from being anal (nevermind the poor word choice for a food blog). 
Strawberry-Lemonade Whoopie Pies from Bakers Royale
So why after all that would I post it? I like the recipe, its good. Why not re-shoot? Because I was tired and Matt and the little guy heard me griping about my dislike and dissatisaction with the set—which they both liked and told me, “If that’s the best you can do, that’s all you can ask for”. Sweet, comforting and honestly slightly depressing—that, this is my best? 
Well it was for the day. And that’s what I’m finally learning–there’s always  tomorrow.

STRAWBERRY LEMONADE WHOOPIE PIES

Ingredients:

Lemon whoopie cake
  • 2 ¼ cup all-purpose flour
  • 1/2 cup brown sugar, lightly packed
  • 1 teaspoon baking powder
  • 1 tablespoon lemon zest
  • 1/2 cup sour  cream
  • 1 teaspoon baking soda
  • 1 large egg
  • 1 teaspoon vanilla extract
  • 1/2 cup vegetable oil
  • 1/2cup carbonated water
  • 3 tablespoon lemon juice
Lemon buttercream frosting
  • 21/2 cups confectioner sugar
  • 1 cup unsalted butter, softened (to ice cream consistency)
  • 3-4 tablespons of whipping cream
  • 1 teaspoon lemon extract
Strawberry Glaze
  • 2 cups confectioner sugar
  • 2 strawberries, finely minced
  • 1 tablespoon lemon juice

Directions:

To make lemon whoopie cake:
  1. Sift flour, brown sugar, baking powder and lemon zestin a bowl; set aside.
  2. In second bowl fold baking soda and sour cream until combined; set aside.
  3. Place egg, vanilla extract and vegetable oil in a bowl and whisk until well combined and mixture is slightly emulsified. Add in sour cream mixture and whisk until combined. Add carbonated water and and lemon juice whisk until combined.
  4. Combine flour mixture with wet mixture fold to combine.
  5. Transfer mixture to a pastry bag fitted with a round tip and pipe onto a parchment line bake sheet.
  6. Bake at 350 degrees for about 10-12 minutes or until bottoms are golden brown.
To make easy lemon buttercream frosting:
  1. Place confectioner sugar and butter in a stand mixer bowl fitted with a paddle attachment and beat butter and sugar on low until combined. Increase speed and beat for another 2 minutes. Add in lemon extract, 2 tablespoons of whipping cream and beat until combined. Add remaining whipping cream if needed for spreading consistency or more confectioner for more stiffness.
To make strawberry glaze:
  1. Place all ingredients in a bowl and stir to combine.  
Assembly
  1. Place frosting on bottom side of one cookie and place a second cookie bottom side down on frosting. Pour 1 teaspoon of glaze on top.


http://www.bakersroyale.com/strawberry-lemonade-whoopie-pies/
0
Want to know the best thing about semifreddo? It’s basically a no-churn ice cream recipe, but still creamy—it just never really gets hard. Which is fine by me, since I like soft ice cream—whether it’s the trashy Thrifty store brand I grew up on or good quality ice cream that I’ll mash and push around with my spoon until it softens. Obviously, I’m not a picky ice cream eater.
Raspberry & Chocolate Ripple Semifreddo via Bakers Royale
Although that shouldn’t be mistaken that I don’t know the difference between the two. Given the choice between creamy good quality ice cream or ice-y cheap stuff, I’ll take the former (small exception for the mint chip ice cream – a flavor that can only be satisfied with the nostalgia of cheap licks, outside of Thrifty, sitting down curbside).
Raspberry & Chocolate Ripple Semifreddo from BakersRoyale
So how does this semifreddo stack up? It’s deliciously creamy and slightly airy enough to feel it dissipate on your tongue. If you don’t have an ice cream maker and you don’t mind soft creamy ice cream—make this—it’s easy and completely satisfying.
Raspberry & Chocolate Ripple Semifreddo by Bakers Royale

RASPBERRY & CHOCOLATE RIPPLE SEMIFREDDO

Ingredients:

  • 4 oz. chocolate
  • 2 tablespoons butter
  • 8 oz. raspberries
  • 2 large eggs
  • 1 large egg yolk
  • 3/4 cups sugar + 2 tablespoon sugar
  • 1 1/2 cup heavy cream
  • 1 1/2 teaspoon vanilla bean paste (or vanilla extract)

Directions:

Preparation: Line a 9x5 loaf pan with plastic wrap leaving a two inch over hang on each side.
  1. Place chocolate and butter in a bowl set over a pot of simmering water and stir until melted and everything is combined; remove from heat and set aside. Place raspberries and 2 tablespoons of sugar in a blender or food process and pulse until pureed; set aside.
  2. Place eggs, egg yolk and sugar in a bowl set over a pot of simmering water and using a hand mixer beat until mixture is pale and thick (mixture should resemble cake batter), about 5-7 minutes. Remove from heat and continue to beat for another 4-5 minutes to cool mixture. (Optionally, you can place the bowl in an ice bath to quicken the cooling). Place heavy cream in a chilled bowl and using a hand mixer beat until soft peaks form. Add vanilla and beat until combined. Fold the two mixture together until combined.
To assemble
  1. Pour 1/2 cup or more of semifreddo mixture into pan and spoon stripes of raspberry puree and chocolate on top. Continue to layer like this until all ingredients are used. Place in the freezer for 4-6 hours or until set.


http://www.bakersroyale.com/raspberry-and-chocolate-ripple-semifreddo/
0
Alright, what is a peanut allergic person doing reviewing Averie Sunshine’s book Peanut Butter Comfort? First off I’m not so allergic, I can work with it (I can’t ingest it, I basically turn into a puffer fish and my tongue swells—super attractive). Good thing for me, because my family loves PB. So along with that and being friends with Averie—yes, I had to review this. Peanut Butter Banana Bread Pudding Cake via BakersRoyale
I made several recipes, all as is, then of course, I tweaked it by subsituting the peanut butter for almond butter. No surprise both versions were good—which is a testimony to how solid the recipes are.
The recipe you see here today was one I chose because banana bread is a favorite in my home. My family can’t seem to get enough of it. And I am always on the hunt for a new banana bread recipe. This one did not disappoint. The peanut butter version is something new to my family—they loved it. The little guy drizzled honey on his and his cousin—she couldn’t get enough it. She patiently sat and watched me shoot this, just so she could take home the left overs.
Peanut Butter Banana Bread Pudding Cake from BakersRoyale
As for me, I had to make it without the peanut butter just to see what the pudding mix would do in a banana bread recipe. Sure, you can make it without the mix, but as she says in the book “. . .it makes the recipe”. And yes, I actually made this three times: one as is, second time around with no PB, and third time with no PB and pudding—I think it’s fair to say, this one will be working its way into the family recipe box.
With all that said, let’s do this book review:
By the numbers:
  • Over 100 recipes
  • Average prep time per recipe: 25 minutes
  • Approximate book cost: $17.95
What I liked and you might too:
  • Yes, I’m allergic to peanuts (not so much I can’t work with it), so I’ve adapted some of the recipes by omitting it completely or by substituting it with almond butter, Nutella or cookie butter and the recipes work fine.
  • Easy recipes with lots of helpful hints and notes for ease of prepping and success. Along with that Averie has a whole primer chapter about key ingredients, methods, tips and tricks.
  • As always, read the headnotes—it’s where you find out about the author, which is nice. Otherwise it’s just a book of recipes without any story—and that is just boring.
A few of my favorite recipes:
  • Peanut Butter Banana Pancakes with Caramelized Bananas Peanut Butter Maple Syrup. Admittedly, I made mine with almond butter, but my little guy has always loved bananas and PB, so I first made these as they were intended and now it’s his favorite pancake breakfast.
  • Rice Krispy and Peanut Butter Cup Brownies. Okay, I made this as is for some neighbors and they thought it was genius. Which of course, solidified the fact that this is the next recipe I will be making with a few change-ups—stay tuned.
  • Molasses Ginger Bread Cookie. If you are a regular reader than you know my little guy loves cookies, but without chocolate and without my usual heavy-handed extras. This was his favorite, no surprise since he loves the flavor of the fall spices and the cookies are “awesomely chewy”. As for me, my version was with almond butter and yes, it’s “awesomely” chewy.
  • Nutella and Oreo Chocolate Cookies. I can’t speak towards how they are, but my friends will tell you it’s one to repeat.
  • BANANA BREAD PUDDING CAKE

    YIELD: Makes one 9x9 pan

    Ingredients:

    Banana Bread Pudding Cake
    • 1/2 cup of butter, melted
    • 2 tablespoons creamy peanut butter
    • 3/4 cup granulated sugar
    • 1/4 cup light brown sugar, packed
    • 1 large egg
    • 1/2 cup sour cream (or Greek style yogurt)
    • 1 1/2 teaspoon vanilla extract
    • 2 large or 3 small bananas mashed, (about 11/2 cups)
    • One 3.5 oz. box of French Vanilla flavored instant pudding mix (not sugar free)
    • 1 cup of all-purpose flour
    • 3/4 teaspoons baking soda
    • 1/2 teaspoon salt, optional
    Vanilla Caramel Glaze
    • 1/4 cup butter
    • 1/4 cup light brown sugar, packed
    • 2 tablespoon cream or milk
    • 1 1/2 teaspoons vanilla extract
    • 1 to 1 1/2 cups of confectioner sugar, sifted

    Directions:

    To make banana bread pudding cake:
    Preparation: Heat oven to 350 degrees F. Line a 9x9 pan with foil.
    1. Melt butter in a large microwave safe bowl, about 60-90 seconds on high power. Add peanut butter to the melted butter and heat for an additional 20 sends on high power to melt. Stir the mixture until combined and smooth.
    2. Add the sugars and whisk to combine. Add the egg, sour cream (or Greek style yogurt), and vanilla and whisk until smooth and free from streaks. Add bananas and stir to incorporate. Add the pudding mix and stir to incorporate (do not make pudding as instructed on the box). Add flour, baking soda, and salt and stir until just combined and free of streaks.
    3. Pour bater into prepared pan and bake for about 35 minutes, or until top is golden, set in the middle and edges have slightly pulled away form the sides of the pan and a toothpick inserted in the center comes out clean. Allow cake to cook in pan for at least 20 minutes before removing, serving or glazing Vanilla Caramel Glaze.
    To make vanilla caramel glaze
    (this is a fast-moving recipe, so have everything in place)
    1. Place butter in a small pan over medium-heat to melt. Add the brown sugar to the melted butter and bring to a boil, stirring continuously. Allow mixture to boil rapidly for 2 minutes, stirring continuously.
    2. Remove pan from heat and add cream (the mixture will bubble wildly), whisk to combine and until bubbles subside. Add vanilla and whisk to combine.  Add confectioner sugar 1/2 cup at a time until desired glaze consistency is reached.
    3. Pour glaze on top, using a off-set spatula warmed with hot water and dried off spread glaze to an even finish. Place chocolate in a plastic bags and cut the corner off of one end. Drizzle top with melted chocolate. (Glaze will set and become slightly crystallized. To cut without putting cracks through the top, warm edge of knife with hot water and wipe dry then slice).


http://www.bakersroyale.com/banana-bread-pudding-cake-with-vanilla-caramel-glaze/
0
Apparently, I am in the zone for the week—the brownie zone. So from Monday’s Inside-out S’mores Brownies to these Crunchy Cookies and Cream Brownies, I’ll have another very soon.
Crunchy Cookies & Cream Brownie Bars from Bakers Royale
I don’t know if its summer, the heat or what, but my body has been set to slugginess for the past week. I’m having the hardest time with moving my butt around lately. Yes, I would love to just slump down on the sofa and succumb to it, but I’m always racked with guilt when I do nothing. And true to form—the other night instead of exhaling—I got up off the sofa at 10pm and marked this off the “to-try list”. Nevermind the “to-do list” full of weighty things pertaining to financial matters, household maintenance and all the other eye-skimming stuff Matt has written down for us.
Crunchy Cookies & Cream Brownie Bars via Bakers Royale
The to-try list is just way more gratifying. And in keeping with the mood, I cherry-picked the easiest one to make—you know, something perfectly suited for the lazy baker in me.
These don’t take much effort. If the lazy me can muster up the energy, you can too. Trust me, you will be well rewarded.
Crunchy Cookies & Cream Brownie Bars by Bakers Royale
A few notes:
  • These Crunchy Cookies and Cream Brownies are an adaptation of these from Lindsay’s blog’with the following changes: I swapped the peanut butter for Nutella, omitted the peanut butter cups all together, swapped the Rice Krispie cereal for some of these cookies and cream cereal (or you can use any suitable cereal you have on hand) and increased that portion from 1 1/2 cups to 2 1/2 cups for more crunch, and then threw in some marshmallow for some textural contrast.
  • As Lindsay mentioned, these get melt-y in the heat, so eat’m fast (not a problem here ) or serve slightly chilled.
Crunchy Cookies & Cream Brownie Bars - Bakers Royale

CRUNCHY COOKIES AND CREAM BROWNIES

YIELD: Makes one 9x13 pan

Ingredients:

BROWNIE BASE:

  • 3/4 cup (1 1/2 sticks) unsalted butter
  • 1 3/4 cups semisweet chocolate chips, divided
  • 1 1/2 cups granulated sugar
  • 1/2 cup light brown sugar, packed
  • 1/2 teaspoon instant espresso powder or 2 tablespoons brewed coffee (optional)
  • 1 1/2 teaspoons vanilla extract
  • 3 large eggs
  • 1 cup all-purpose flour

 TOPPING:

  • 1 1/2 cups semisweet chocolate chips
  • 1 1/2 cups Nutella
  • 1 tablespoon butter
  • 2 1/2 cups Cookies and Cream cereal

Directions:

To make brownie base:
  1. Heat oven to 350 degrees F. Line a 9-by-13-inch baking pan with aluminum foil;  lightly cover with bake spray.
  2. Place butter and 3/4 cup chocolate chips in a large microwave safe bowl. Heat on high power for 60 to 90 seconds, stirring every 10 to 15 seconds to prevent scorching. When chocolate is melted and mixture is smooth, stir in sugar and brown sugar (batter will appear grainy).
  3. Add the coffee or espresso powder and vanilla extract and stir until combined.
  4. Whisk in eggs until incorporated. Sprinkle the flour over top and fold until just combined. Stir in 1/2 cup chocolate chips then pour batter into prepared pan.
  5. Bake for about 25 minutes or until brownies are mostly done. Remove from oven and sprinkle remaining 1/2 cup chocolate chips over top. Return pan to oven and bake for 3 to 4 minutes more. Transfer pan to wire rack to cool.
To make topping:
  1. Place chocolate chips, Nutella, and butter in a large microwave safe bowl. Heat on high power for 1 minute, stirring every 10 to 15 seconds, until melted and smooth. Let cool slightly. Add cookies and cream cereal and marshmallow and toss to coat. Spread cereal mixture over top of brownies, then cover and refrigerate for at least 90 minutes, or until set, or overnight. Brownies will keep, refrigerated in an airtight container, for up to 1 week.


http://www.bakersroyale.com/crunchy-cookies-and-cream-brownie-bar/
0
I decided to defy sensibility by delaying my no-bake series for another week, because this past weekend was the hottest of the summer. Yes, instead, I cranked up the oven and started baking with fall in mind as evident by the pear tart you see in the picture.
Gluten-Free Pear Tart via Bakers Royale
See what I mean about defying sensibility? To take it step further, I decided to go gluten free with this one. Which of course really had Matt questioning, “What’s going on here?”
Gluten-Free Pear Tart from Bakers Royale
Nothing other than just, you know, the regular switch up when I start to feel things getting stagnant around here. So don’t worry, I’m not going gluten-free, I just happen to really love this recipe I developed for a girlfriend of mine who is gluten free.
And as for the two differently styled pictures—well, I was struggling, but that quickly ended when I dropped the tart. Nothing like a forced finish.
Pears  

GLUTEN-FREE PEAR TART

Ingredients:

  • 1 cup almond meal
  • 1/3 cup coconut flour
  • 1/4 teaspoon baking powder
  • 1/4 cup vegetable oil
  • 2 eggs
  • 1/3 cup sugar plus 3 tablespoons of sugar
  • 1/4 cup Greek yogurt
  • 2 teaspoons grated orange zest
  • 3 pears halved and cored

Directions:

Preparation: Heat oven to 350 degrees F. Lightly cover 4x14 tart pan with bake spray.
  1. Sift almond meal, coconut flour and baking powder; set aside.
  2. Place oil, egg and 1/3 cup of sugar in a food processor and pulse until mixture is emulsified. Add greek yogurt and orange zest until well combined. With the food processor still running add in the almond meal mixture and pulse until combined. Pour and press mixture into a 4x14 tart pan. Toss pears in remaining sugar and press them into tart mixture.
  3. Bake at 350 degrees for about 40 minutes or until cake tester inserted into tart mixture comes out clean. Cool completely in tin. Serve with some drizzled honey.
A few notes:
  • For the Greek yogurt I used Chobani, the coconut flour is Bob's Red Mill and the almond flour is from Trader Joe's.
  • If you don't have a food processor use a stand mixer, if you do not have a stand mixer, use a large whisk and make sure to emulsify the oil, eggs  sugar for best results.


http://www.bakersroyale.com/gluten-free-pear-tart/
0
Oh, I just had to—there’s just something I love about photographing smashed, spilled, dropped or otherwise “deconstructed” food.  Yes, it’s still edible. So with that out of the way, let’s talk gluten-free cake.
Gluten-Free Blueberry & Coconut Cake via BakersRoyale
The cake was actually born out of macarons gone bad. I accidentally grabbed the coconut flour instead of almond flour. It wasn’t until I started mixing that I realized my mistake. And, being the cheapo that I am, I didn’t want to waste what I had started and decided to flip it to a cake.
The short of this kitchen mistake turned bountiful:  30+ plus eggs later and with test runs that included mayo, yogurt, and buttermilk—I finally found the right ratio and the magic ingredient. It’s not the yogurt, because that made the cake too wet and gummy and the buttermilk left too much of a strong tangy aftertaste. Of all things—it was the mayonnaise that pulled it altogether.
Weird, right? Well, sort of.  It’s not at all that weird if you’ve made a chocolate cake with mayonnaise. Which I have, so I understood that it can add a lot of moistness and tenderness to the crumb. What it couldn’t do in this cake was replace the eggs as it does in chocolate cake.
If you’re wondering about the texture, it’s like sponge cake meets pound cake. The taste, well—it’s spot-on—and “coconutty”, as it should be since it’s made with only coconut flour.
Gluten-Free Blueberry & Coconut Cake from BakersRoyale
A few notes:
  • The recipe is written in weight measurements for accuracy.
  • Keep in mind the egg white and coconut flour mixture will be stiff and and thick, not wet.
  • For the coconut butter I used MaraNatha brand. Coconut butter tends to separate when settled, so make sure to put a spoon to it and mix it up before measuring it out.
  • The coconut flour I used is Let’s Do Organic, but since coconut flour is naturally gluten free use any brand you can find in your area.
  • For the baking powder I used Clabber Girl. I mention this because, apparently not all baking powder is considered gluten-free and this one is, even though it’s not advertised as such. But if you have a gluten allergy – please verify this on your own.
  • For a darker and more even golden crown on the outside use a dark bundt pan like this one. The cake as shot in the pictures was made using a bundt pan with a light inside like this one. You can see the difference a pan makes by looking at the picture here (baked with the darker bundt pan).

GLUTEN-FREE COCONUT BLUEBERRY CAKE

YIELD: Makes 1 10 in. bundt cake

Ingredients:

  • 130 g coconut flour
  • 105 g powder sugar
  • 5 g baking powder
  • 195 g egg whites
  • 75 g granulated sugar
  • 40 ml vegetable oil
  • 60 g coconut butter
  • 25 g mayonnaise
  • 255 g eggs
  • 170 g blueberries

Directions:

Preparation: Cover bundt pan with bake spray. Heat oven to 350 degrees F
  1. Sift the coconut flour, powdered sugar and baking powder together; set aside. Place the egg whites and granulated sugar in a stand mixer bowl fitted with a whisk attachment, beat on low until mixture becomes opaque. Increase speed to high and beat until mixture holds stiff peaks and gathers in and around the whisk even when it is lifted out of the bowl.
  2. Dump coconut flour mixture into egg white mixture and fold to combine until well incorporated. Mixture will be thick and stiff (almost cookie dough like).
  3. Place oil, butter, mayonnaise in a mixer bowl fitted with a whisk a attachment and beat on medium high until combined. Add in one egg at a time, making sure each one is well incorporated before adding the next.
  4. Decrease speed to medium and add egg white mixture and beat until incorporated. Turn off mixture and fold in blueberries. Pour cake mixture into prepared pan and bake at 350 degrees F for about 40 minutes or cake tester inserted in the center of the cake comes out clean (a few crumbs are okay). Remove from oven and cool on rack.


http://www.bakersroyale.com/gluten-free-coconut-blueberry-cake/
0
Previous PostOlder Posts Home